Safecopy is a data recovery tool that aims at getting the maximum data possible from a damaged or corrupted storage device. It is one of the most reliable tools to recover data when all other tools fail you can try this one. This software is written using the c programming language.
In this article, I will discuss how to install and use the Safecopy data recovery tool in Ubuntu.
Features of Safecopy data recovery tool
The key features of Safecopy data recovery tools are –
- More reliable than other recovery tools in Linux
- It creates a filesystem image of a damaged disk or media
- Uses incremental data rescuing
- You can pause and resume data rescuing operations at any time
- You can share data using the private data sharing link option
How to install Safecopy in Ubuntu
The Safecopy tool is available in the Ubuntu repository you can easily download and install it on your system. Before installing it first run the system package list and upgrade all the packages to their new version by using –
sudo apt update && sudo apt upgrade -yNow use the following command to install Safecopy on your system –
sudo apt install safecopyPress y and then enter when it asks for your confirmation.
How to use Safecopy for recovering data on a storage media
The syntax for using the Safecopy tool in the terminal is given below.
safecopy[options] source destinationYou can find the detailed list of options that can be used with the safecopy command on its manpage.
First, use the following command to check the list of disks and partitions on your system.
df -hIdentify the correct device where you want to recover your data and then use the given command.
For example –
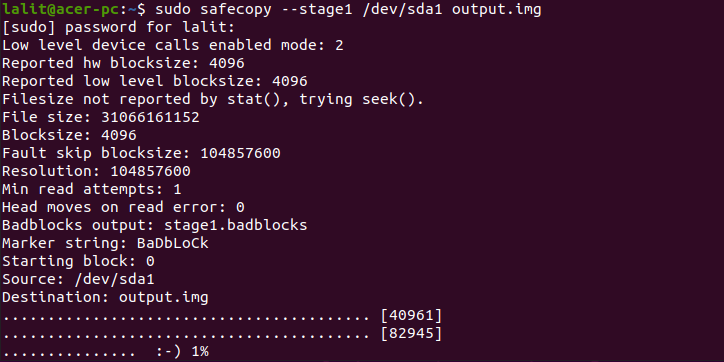
sudo safecopy --stage1 /dev/sda1 output.imgWhere /dev/sda1 is the source where we are going to recover data and output.img is the output of safecopy.
The option --stage1 is used to recover most of the data fast using no retries and avoiding bad areas.
Using option --stage2 instead of --stage1 will make the Safecopy rescue more data, using no retries but searching for exact ends of bad areas.
sudo safecopy --stage2 /dev/sda1 output.imgWhen you use option –stage3 with Safecopy command then Safecopy will rescue everything that can be rescued using maximum retries, head realignment tricks, and low-level access.
sudo safecopy --stage3 /dev/sda1 output.imgOnce the recovery is completed the data will be saved in your current working directory.
To know more about the usage of Safecopy you can visit its manpage.
Conclusion
I hope now you understand the usage of Safecopy on your Ubuntu system. Now if you have a query then write us in the comments below.