Apache Spark is an open-source, multi-lingual, fast unified analytics engine for big data and machine learning. Originally it was developed at UC Berkeley’s AMPLab and later its codebase is donated to Apache Software Foundation.
It distributes workload across multiple computers in a cluster to effectively process a large set of data. Apache Spark supports various programming languages such as Java, Scala, Python, and R.
Today in this article we will discuss how to install Apache Spark on a Ubuntu system.
Prerequisites
To follow this article you need the following things –
- A computer system with Ubuntu installed on it
- Access to a user account with sudo privileges
Installing required packages for Apache Spark
Apache Spark requires a few packages to be installed on your system before you install it. The required packages are Java, Scala, and Git, to install these packages use the following command in your terminal –
sudo apt install default-jdk scala git -yOnce completed you can verify the installation by using the given command-
java -version; scala -version; git --version
Download and install Apache Spark on Ubuntu
Go to the official download page of Apache Spark and choose the latest version and download it. At the time of writing this article, Spark 3.2.0 with Apache Hadoop 3.3 is the latest version so we will install it.
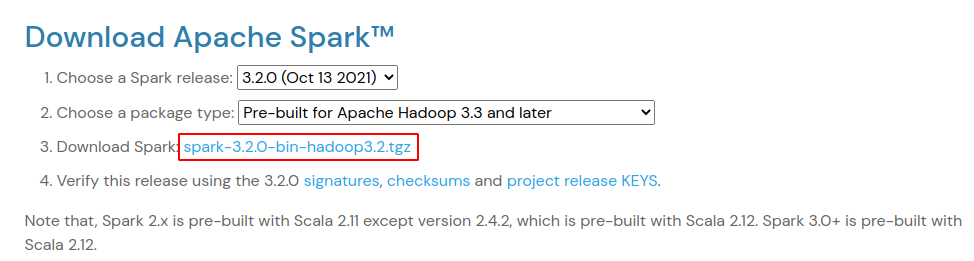
Alternatively, you can use the following command to download the latest Spark package from your terminal.
wget https://dlcdn.apache.org/spark/spark-3.2.0/spark-3.2.0-bin-hadoop3.2.tgzNext extract the downloaded package –
tar -xvzf spark-3.2.0-bin-hadoop3.2.tgzFinally, move the extracted Spark directory to /opt by using –
sudo mv spark-3.2.0-bin-hadoop3.2 /opt/sparkConfigure Spark environment variables
Before you start the Apache Spark on your system you need to set up a few environment variables in the .profile file.
echo "export SPARK_HOME=/opt/spark" >> ~/.profile
echo "export PATH=$PATH:/opt/spark/bin:/opt/spark/sbin" >> ~/.profile
echo "export PYSPARK_PYTHON=/usr/bin/python3" >> ~/.profile
Next, you need to source the .profile file in order to make the changes effective.
source ~/.profileStart Apache Spark on Ubuntu
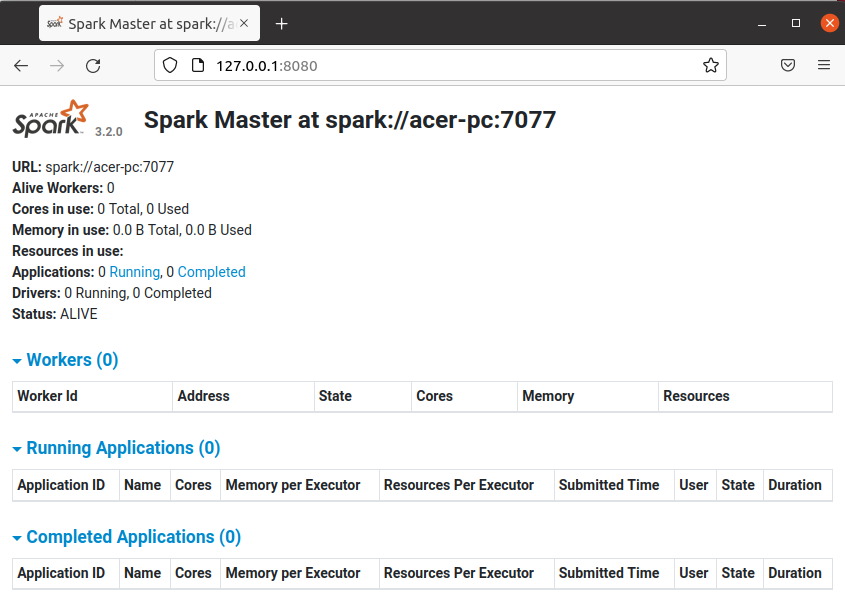
You have set up everything now it’s time to start Spark master and slave servers. Use the following command to start the master server –
start-master.shThis will start the Spark master server now you can check its web interface by entering the given URL in your browser.
http://server_domain_or_ip:8080/For example –
http://127.0.0.1:8080/Now, this should display the given page in your browser.
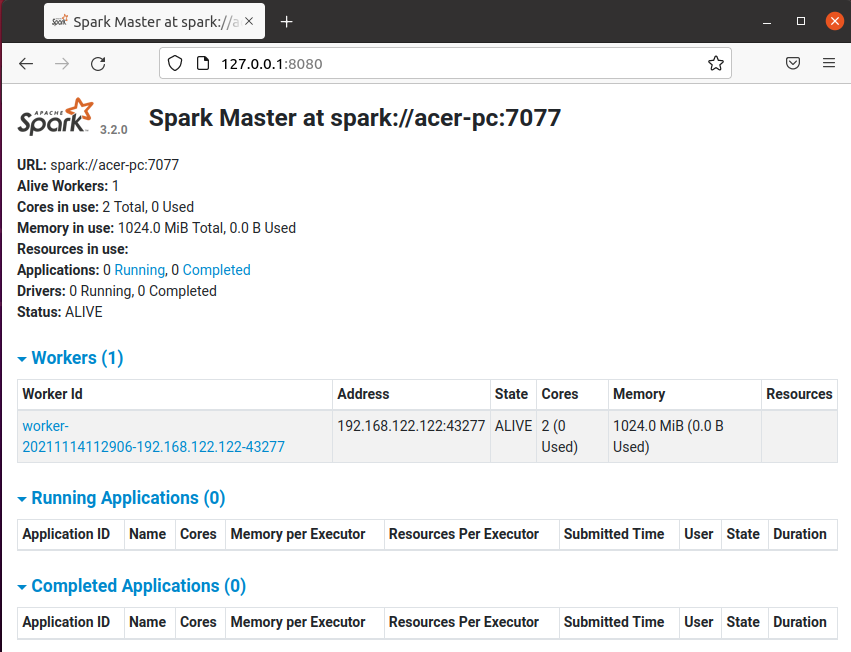
If you want to start a slave server(worker process) with your master server then run the following command in the given format –
start-slave.sh spark://master:portFor example –
start-slave.sh spark://acer-pc:7077Now when you reload your master’s web interface in your browser you will see one worker is added.
Test Spark Shell
Once the configuration is finished you can load the apache spark-shell by using –
spark-shell
Here scala is the default interface if you want to use Python in spark then execute the given command in your terminal.
pyspark
Now if you want to stop Spark master or slave servers then use one of the given commands –
To stop master server use –
stop-master.shTo stop slave server (or worker process) use –
stop-slave.shConclusion
This is how you can install and use Apache Spark in Ubuntu. Now if you have a query then write us in the comments below.