Canonical recently released the latest version of Ubuntu that is Ubuntu 20.04 LTS for desktop and servers. The LTS version of Ubuntu is released once in two years, and get official support of five years.
Dual-booting your system has various advantages over running an operating system in a virtual machine. When you dual boot a system, you get the complete dedicated resource to your current running OS. Unlike virtual machines where system resource gets shared among the multiple operating systems.
If you are looking to run Ubuntu without formatting the disk then here is a guide on how to install and run Ubuntu on Windows PC.
In this article, we will provide you steps by using which you can install Ubuntu 20.04 LTS with Windows 10 in a system.
Requirements
We are assuming here that your system is installed with Windows 10 and we have to install Ubuntu 20.04 LTS along with it.
- 20 GB of space is recommended for Ubuntu 20.04 LTS installation
- Download Ubuntu 20.04 LTS and create a Ubuntu live disk. To create a ubuntu live disk in the Windows OS you could download and use Rufus application.
- To boot from USB you need to disable the secure boot in your system
- We recommend you to take the backup of your existing operating system on the system.
Create free space on the hard disk for Ubuntu 20.04 LTS installation
First, open Windows 10 in your system that you want to dual boot. To allocate space for Ubuntu 20.04 LTS installation follow the steps below –
- Click on start and type computer management.
- When an application appears with the name computer management, click on it.
- Next click on the storage.
- In the next window click on disk management.
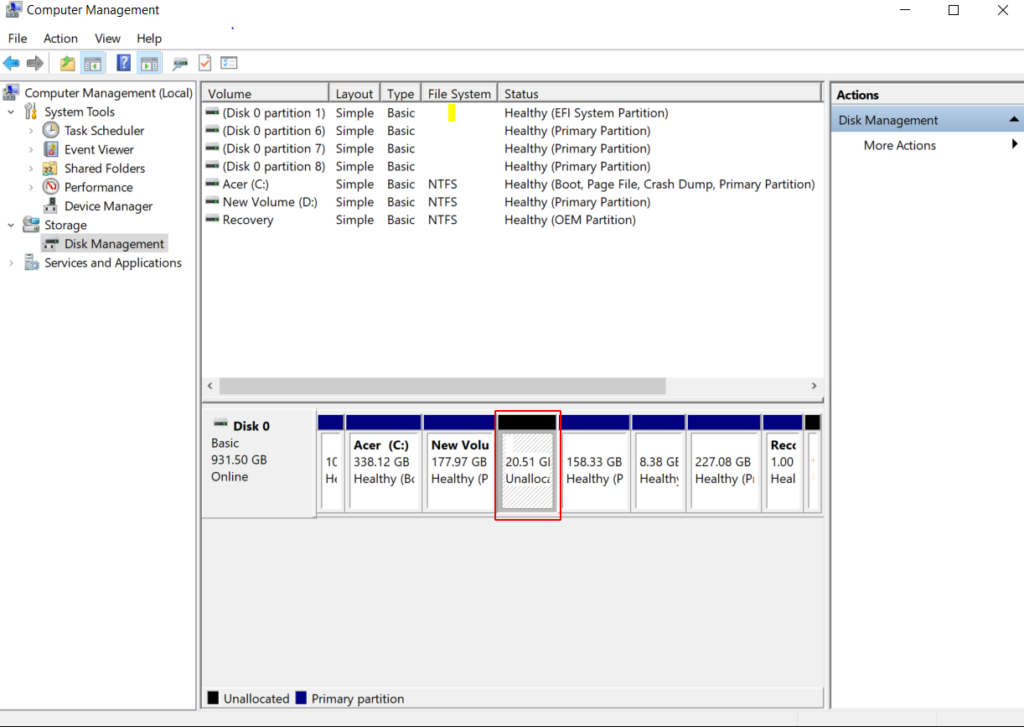
- Identify and right-click on the partition that you are going to shrink to allocate the space for Ubuntu 20.04 LTS.
- Next, click on the shrink and enter the amount of space that you want to allocate and again click on shrink. This will create free unallocated space, look in the image below.
How to boot from Ubuntu 20.04 LTS live disk?
Plug the USB and restart your system, press F10 or F12 to display the boot menu. Now select the Ubuntu live disk from the menu and start the installation. In some systems to boot from USB, you need to disable the secure boot. Secure boot is the feature that allows the PC to boot only through manufacturer trusted firmware.
Start the installation of Ubuntu 20.04 LTS
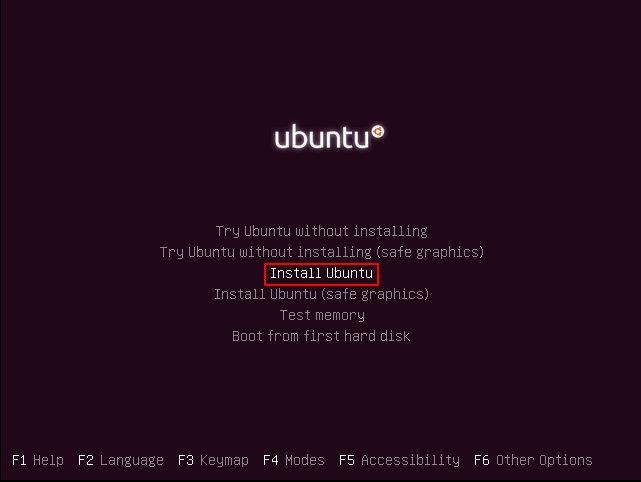
It will take a few seconds to boot, and then you will see a window to select the language. Select a language and press enter. In the next window, you will see the option to install it in your system. To start the installation click on Install Ubuntu.
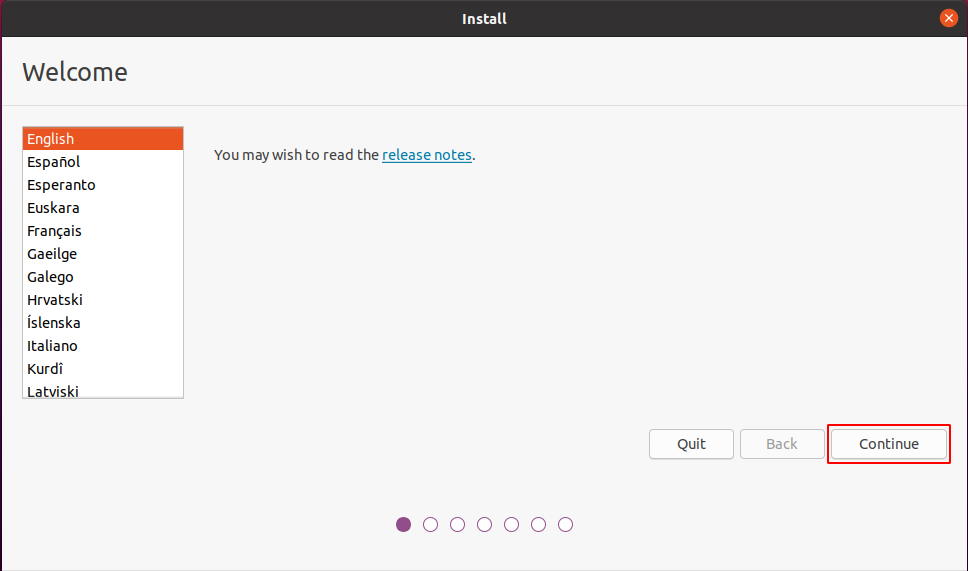
Now next you will see a welcome window, here select your language and click on continue.
In the next screen select the keyboard layout. I will keep it to English(US) and once selected click on continue.

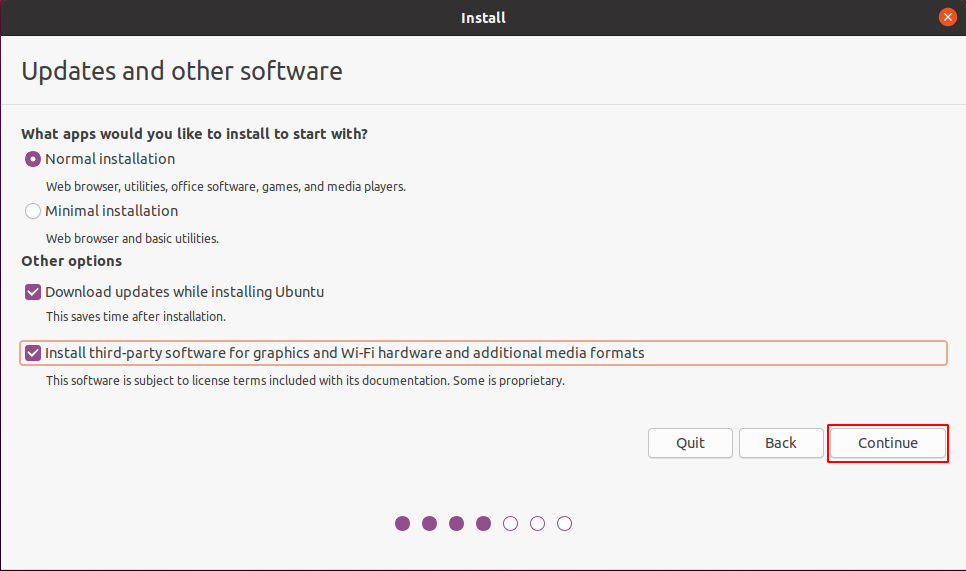
In the next window of Updates and other Softwares, we will select the normal installation. If you want very basic setup of ubuntu then you can choose the minimal installation. It will not install softwares such as office games media player, etc. And in other options select both options as given in the image below. Now click on continue.
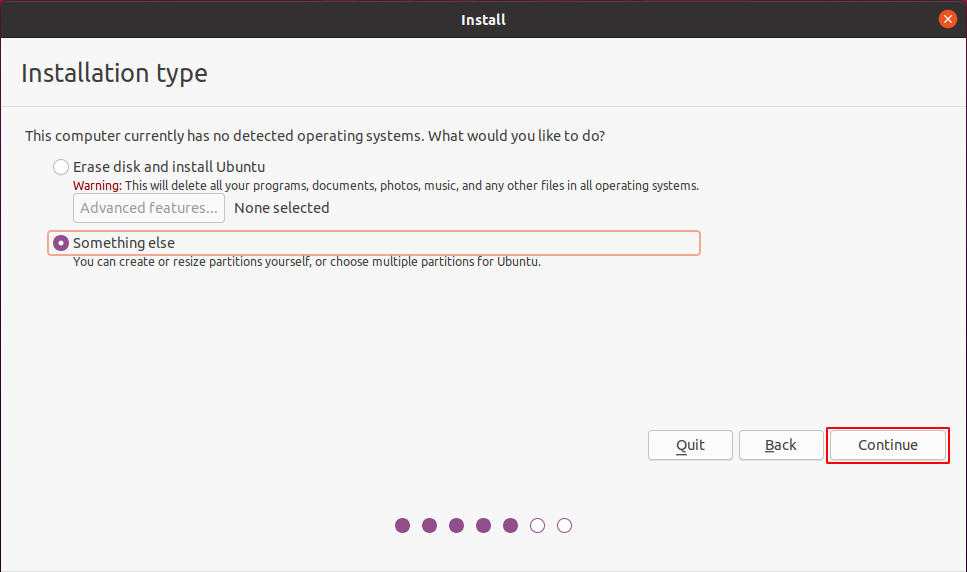
Next in installation type, Select something else and click on continue.
How to create Ubuntu partitions manually?
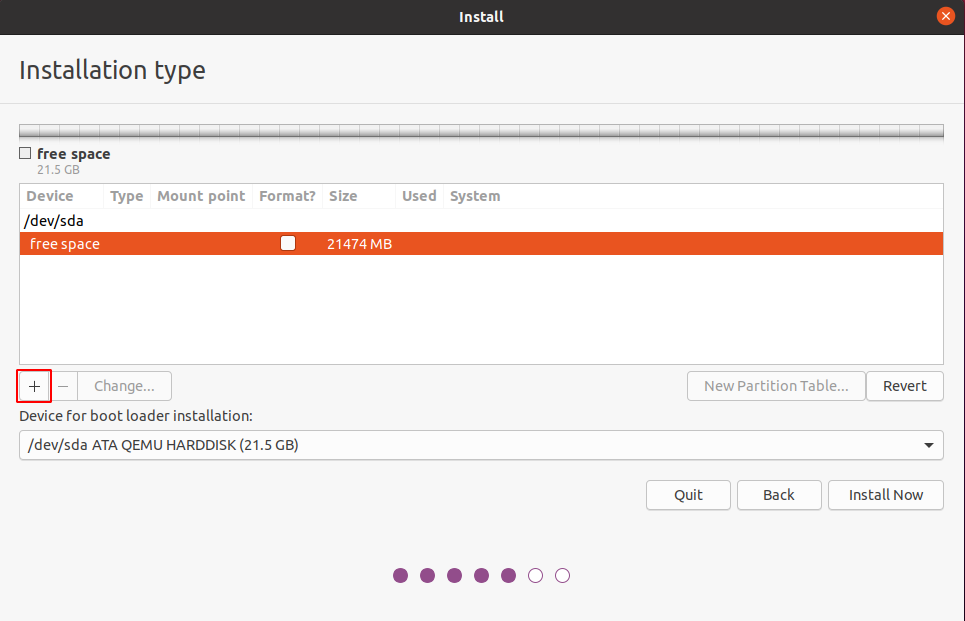
When you click on something else you will move to a new screen where you can see the free space of approx 20 GB that was created from inside the windows OS. Now we will create the partitions for Ubuntu installation. We will create three partitions for it that are-
- / – Root partition 8 GB
- /home -Home partition of 8 GB of size
- /swap – Swap of size 4GB
You might be thinking why swap partition is of 4GB. So you could decide the right amount of swap space by reading an article on the swap.
To create these partitions select the free space and click on the plus sign. Look in the image –
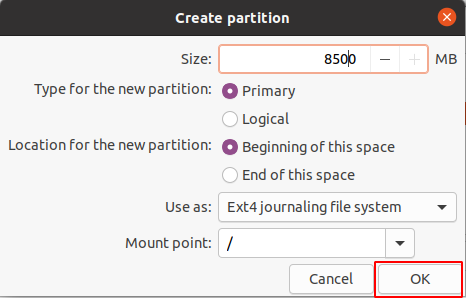
Now when you click on + (plus), a new window will open to fill the details of partition to create. The first partition we will create is the root partition of size 8500 MB, Keep, use as to Ext4 journaling file system. Select the mount point to / and then click on ok. The root partition is now created.
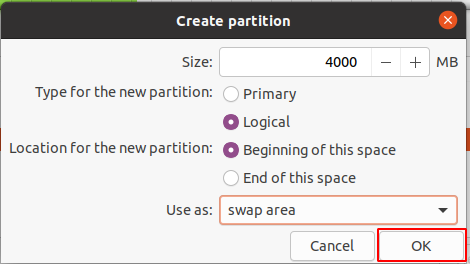
Similarly, Click on remaining free space and create a new partition for the swap partition we will assign it around 4 GB of space. Here click on use as dropdown menu and select it to swap area and press ok.
Now to create home partition click on the remaining free space click on + (plus). Size is filled with the remaining space keep it as it is. Keep, use as to the Ext4 journaling file system. Select the mount point /home and then click on ok. Now all the partitions are created as you can see in the image below.
Select your location
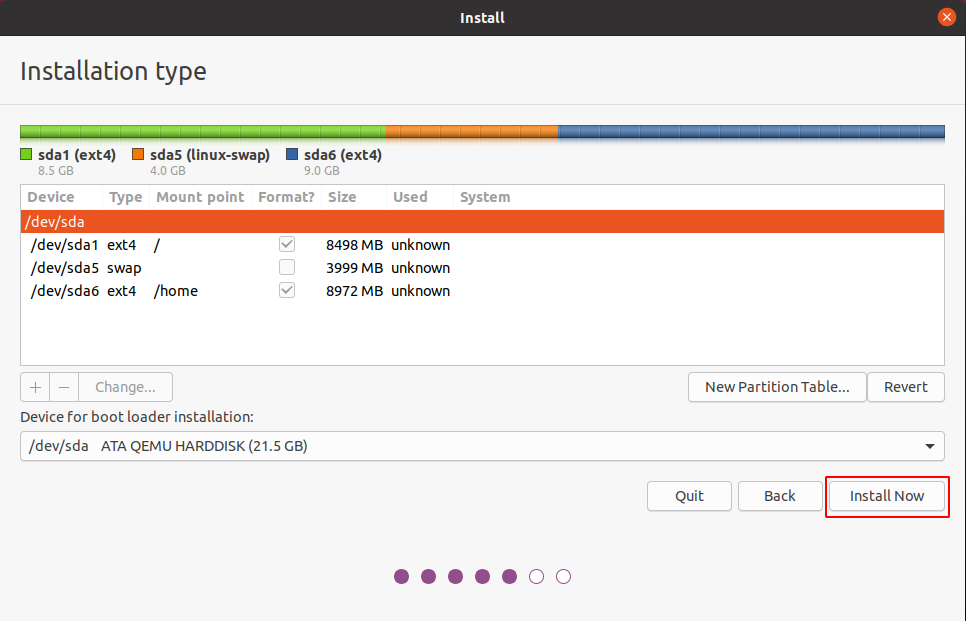
Click on Install Now, In next window, it will ask to write the changes to disk and display the partitions that are going to be formatted. Click on continue to start the installation.
Next, you will be asked to select your location –
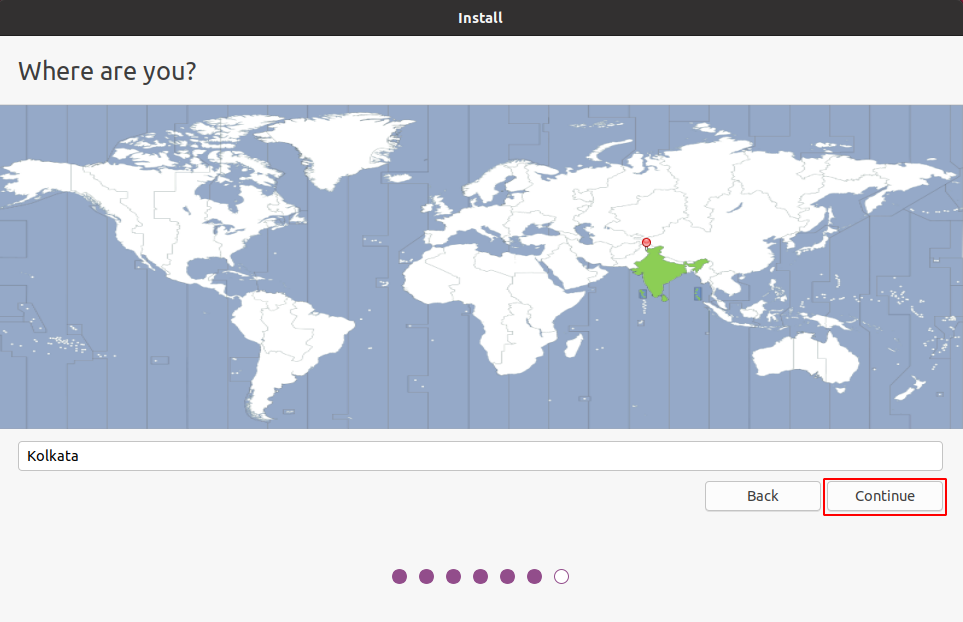
Select your location and click on continue.
Fill your details
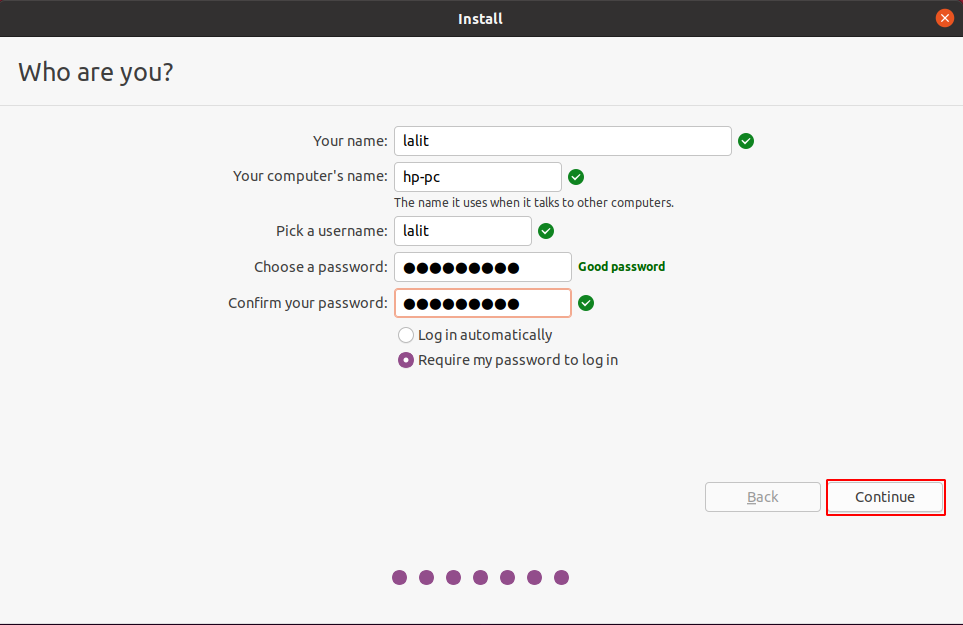
In the next window enter your details such as your name, computer ‘s name, username, and password. You could choose any valid name for your computer name, if accepted you will see a green tick on the right side. Enter all the details correctly and then press continue.
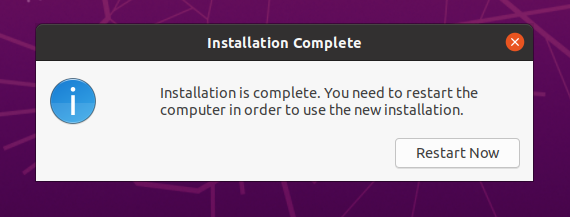
Now the system will start installing OS packages. Once the installation gets complete you need to restart your system in order to use it. Click on Restart Now to restart your system.
On the next boot, you will see the option of Ubuntu 20.04 LTS with Windows 10 on the grub screen.
Now I hope you find this guide useful if you have any thoughts related to this, you can share it with us in the comments below.